 LinkedIn, a social, professional melting pot, combines work with networking. With a whopping global membership of 450 million-plus, if you want a good shot at your career or business, it’s important to learn to dominate LinkedIn.
With such a staggering user base, LinkedIn serves as a platform to carve out a powerful online presence. Despite this, some people fail to tap into LinkedIn’s immense networking and sales potential. They make an account, slap on some information and call it a day. I know I used to treat LinkedIn as an online resume portal until I saw the immense potential of this platform.
That's why I went on a mission to revamp my profile so I could reap the full benefits of this networking powerhouse. In this article, I will share what I did so you can follow in my steps. But first of all, you need to evaluate your own profile.
So, how do you know if your LinkedIn profile is somewhat ineffective, outdated and cluttered? A good rule of thumb is that if the last time you did a profile edit was six months ago or more, then the following makeover tips are going to be crucial.
(On the other hand, if you are just starting out on LinkedIn, then you’re in luck. This how-to will be great for new users and LinkedIn account holders who created profiles and never got around to customizing them.)
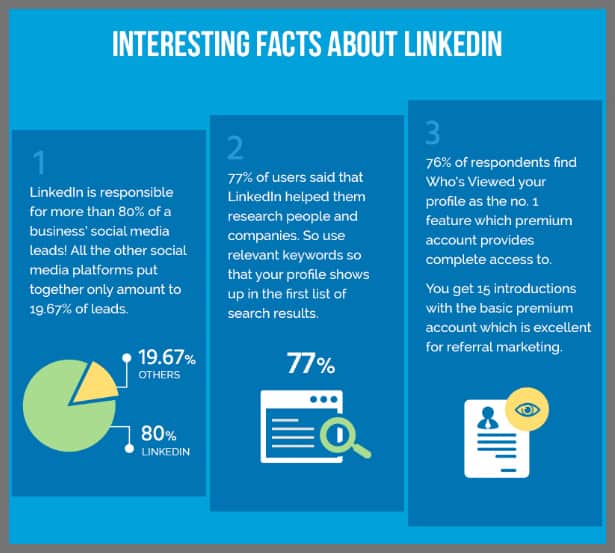
To get you excited you about the possibilities, take a look at these startling LinkedIn facts compiled by Truconversion:
Infographic source: Truconversion
To put it plainly, the numbers above point to LinkedIn’s expanding, already tremendous reach. Spending some time fine-tuning your LinkedIn presence has long-term benefits. And with the 7 LinkedIn tips below, anybody can turn their boring, sleep-inducing profile to a supercharged, networking magnet capable of attracting industry leaders or creating awareness for your brand.
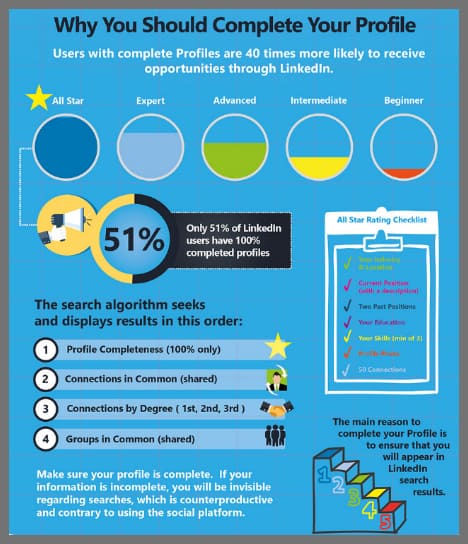
Step #1- Optimize your profile
Infographic source: Leisure Jobs
Like so many people, I used to think LinkedIn should be a reflection of my resume. So, I made it as rigid as possible, filling it with CV-style details.
Ultimately, I took the “social” out of LinkedIn, the same trap many of us fall into. Fast-forward to today and now I know that profile page optimization comes before anything else.
The easiest thing you can do is open your LinkedIn profile in a new browser tab so you can switch between this post and your profile to edit and add stuff as we go.
The Profile Photo
Infographic source: Leisure Jobs
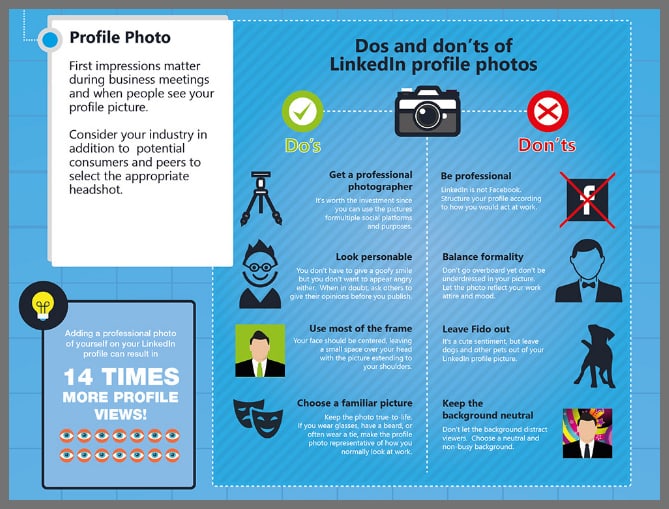
Your profile photo should be updated regularly to reflect your appearance. If you have a photo from ten years ago, change that before you do anything else.
If you are wondering which photo to use, go for ones in which you look most presentable and the photographic image quality is strong, not taken with a dated flip phone camera, for example. Make sure your face is clearly visible and that you are smiling naturally.
Dress for your industry, too. Those in the corporate world should dress professionally while freelancers can get away with something more akin to “business casual.”
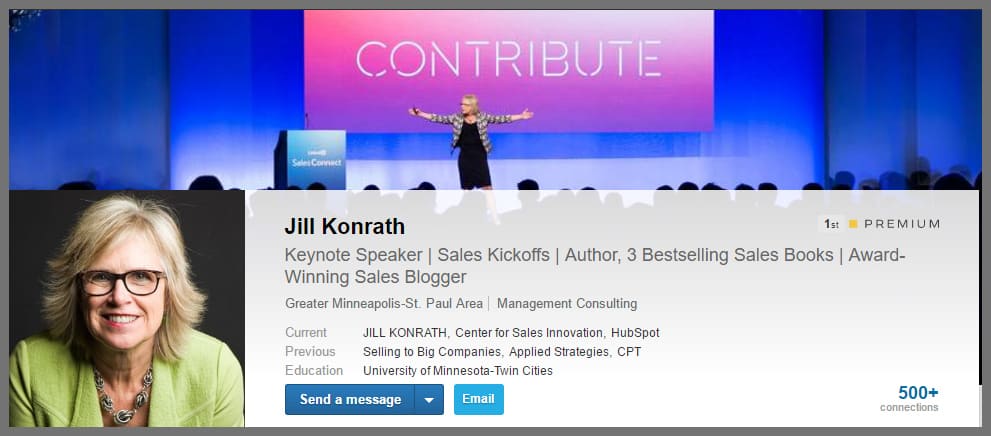
Jill Konrath’s LinkedIn profile is a great reference point, as you can see in the image below. Notice Jill’s friendly facial expression and choice of clothing. Basically, this profile photo ticks all the right boxes.
Source: Jill Konrath’s Linkedin Profile
While you are at it, pay attention to your background image too. You can put all that space to good use by adding a great cover photo (keep the dimensions to 1440 x 425). As you can see above, Jill has nailed this perfectly too.
Bonus: If you want to take professional headshots yourself (at home), then here are some tips to get you going.
The Headline
In simple terms, your headline is how you introduce yourself to others when they ask “what do you do?” This means only your best work should make it up there. Save the rest for the summary or experience section of your profile (which we’ll cover later.)
It is important to note that after your name and display photo, the headline is another piece of information visible wherever you are on LinkedIn, meaning people will see this even before they view your profile page itself.
There are a few ways to go about creating an effective headline. Personally, I feel the best headlines are those that contain a mission/ value statement because prospective contacts can tell what you do at a glance. In short, these headlines allow you to tackle two things at once:
- establish your area of expertise
- point out your ideal customer / client base.
Below is my headline, which contains a mission statement, as well as my job title and where I work.

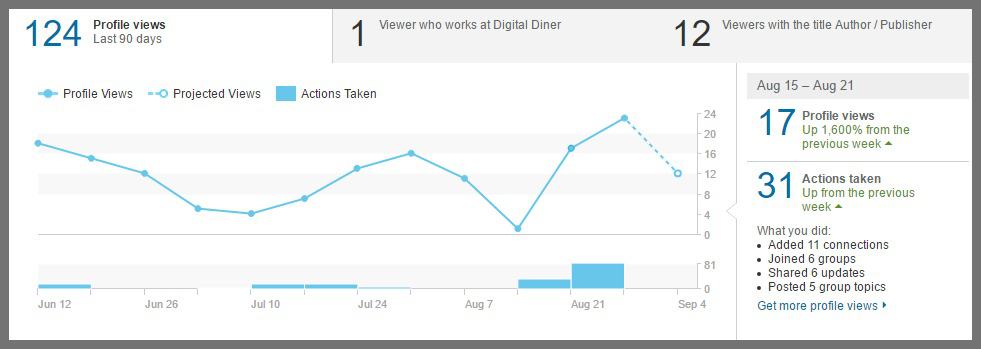
When I changed my headline from the default job title to a mission statement, not only did my profile views increase steadily but I also got more requests for connections with the right people. This was because I added key terms to my headline. Remember, the keywords in your headline determine how you show up in search results.
Bonus: I discovered these no-fail LinkedIn headline ideas that you can explore.
The Summary
After you have sorted out the headline and contact information, head over to your summary. Make sure to reemphasize what you do. Also, add elements that point out what makes you different, etc. In this part, you’re basically selling yourself, so step outside of your own head and picture coming to your profile from your ideal client/buyer’s perspective.
Positioning yourself as the one who can best provide relevant services and solutions will make it easier for people to identify your expertise. Also, add key terms that relate to your field that your contacts might be on the lookout for.
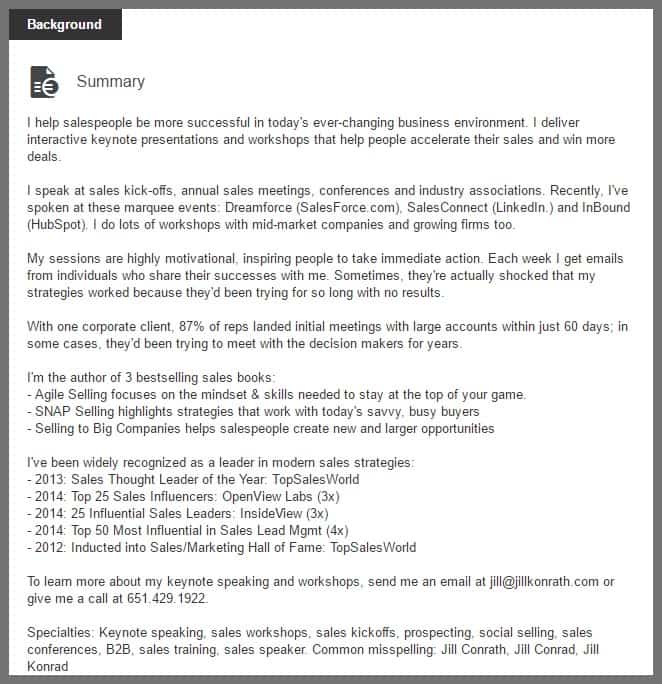
In Jill Konrath’s summary, she actually touches on all the aspects mentioned above. The addition of a specialties section is brilliant because it brings key skills to the forefront.
Bonus: Not sure how to go about writing the perfect summary? Here are a couple of great examples along with templates you can use.
Experience
Here’s where you get full bragging rights. Go ahead and put in all the work you have done so far, including achievements and milestones. There are no hard and fast rules here, although generally, the more open you seem about each previous position, the better.
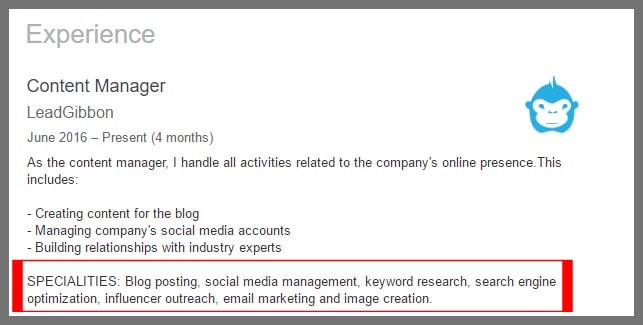
I like to add a specialties section under each to highlight the skills I use during each job.
Bonus: Filling out the experience section can be intimidating. Here is how to nail it.
Skills
Source: Career Sherpa
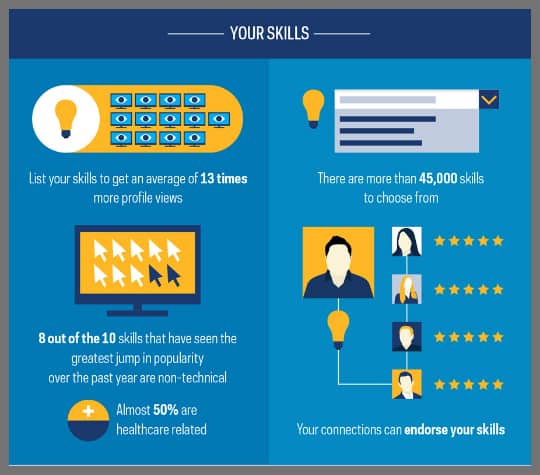
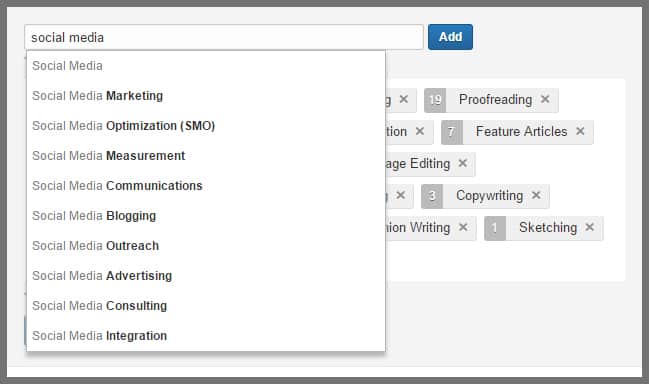
Under skills, add all the abilities which apply to you. (Use LinkedIn’s autosuggest feature as well. Individual skills that may seem irrelevant may be valuable for another potential company.)
I recently fine-tuned my social media skills, so I added this to the list. Take a look at how LinkedIn’s autosuggest feature comes to the rescue with superb suggestions.
Step #2- Expand your network
You can have the best profile in the world but if you’re not putting yourself out there, no one will know you exist.
That’s where LinkedIn search comes to the rescue. This handy feature gives you access to millions of potential prospects.
Using LinkedIn’s search feature
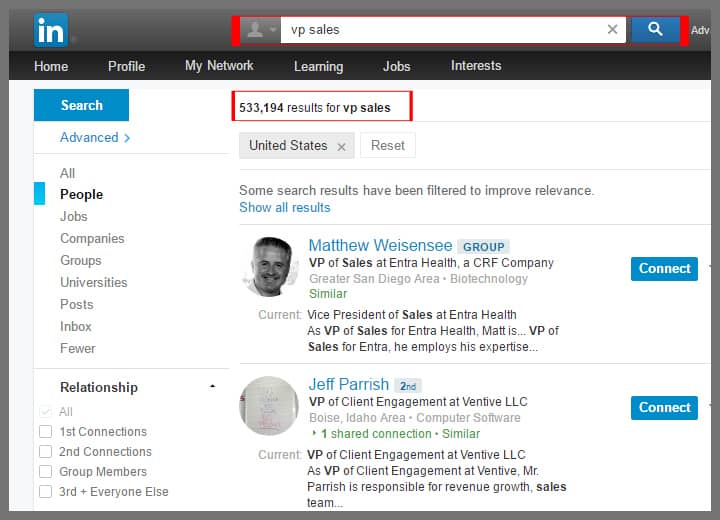
Expand your network easily and effectively by searching for people to connect with. That said, LinkedIn’s search bar is good for finding people, companies, and groups. A casual search can yield a ton of results.
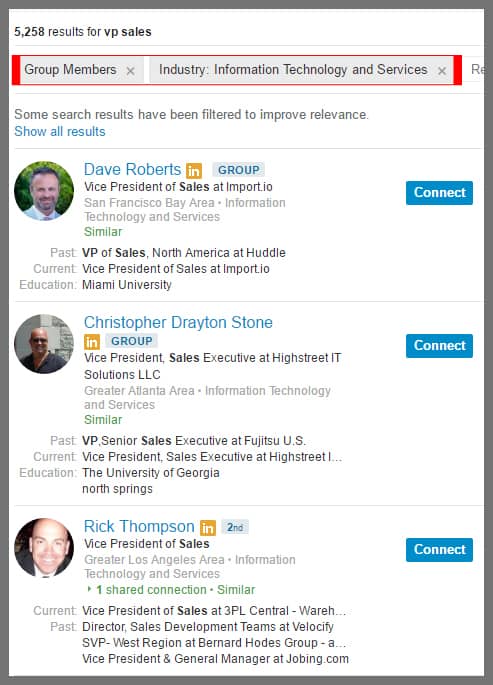
For example, there are 533,194 results for “VP sales”. On the left, select what kind of results you want, whether that means people with this title or jobs or even posts with your keywords.
Likewise, the advanced search option allows you to take the search process even deeper. Use a laser-focused approach here to get the exact results you need.
Now, using the same keywords, I’ll narrow the search results by ticking off group members and the IT industry while specifying the United States as the location for the search.
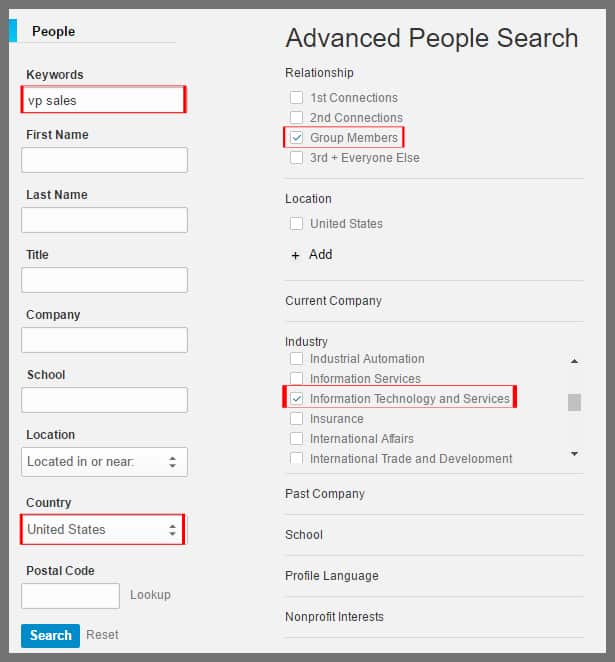
My results (below) show a major roster of VP’s of sales in the same groups as me. The advanced search function shows how easily you can find people merely by entering some specifics.
Bonus: Here are some more ways to search LinkedIn.
Using boolean search operators
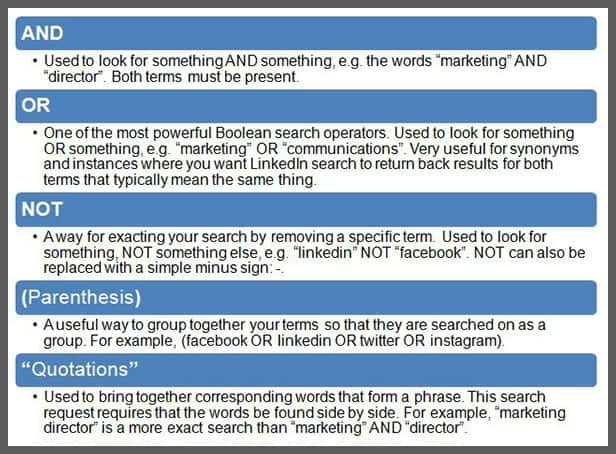
What if you need to dig further by combining multiple keywords? This is where the Boolean search operators come in.
Below is a handy list of the Boolean search operators and their functions. Using these in your search will make a massive difference in the final results.
Source: Imparture
Say I use a Boolean search operator to find anyone in both sales and marketing. Type in both words (capitalizing the first letter of each)…
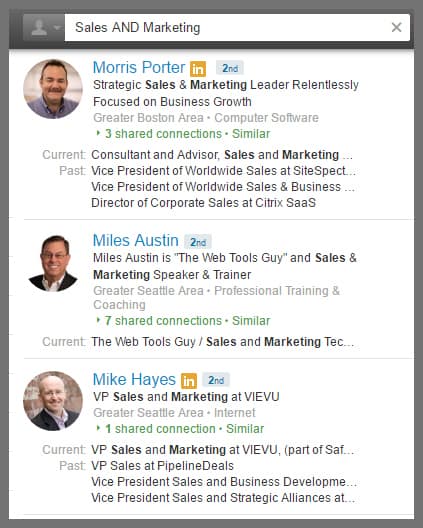
From here, you can further narrow down the results by using filters just like you would with normal search results.
Bonus: You can improve Boolean search results by using these tips.
Save search results
Sometimes, you find a bunch of great search results that you might need for later. LinkedIn allows you to save up to three search results (in the free account). This is a quick and easy way to store data that you can come back to.
You can find this option right on top of your search results.
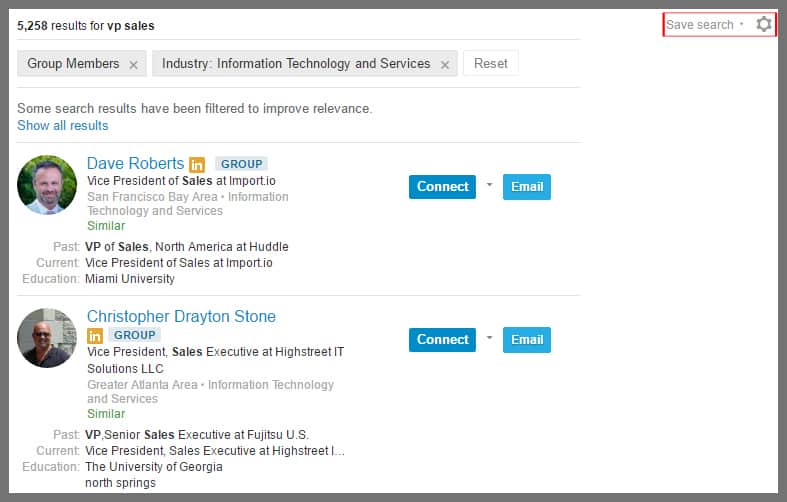
Clicking on the saved searches option opens a window where you can choose to receive emails with new results centered on your preference.

To access your previously saved searches, click on the wheel icon to the right.

Bonus: Not sure why you should start saving searches? Here’s the main reason why.
Stay in the loop
Stay connected (in more ways than one) by keeping tabs on what a contact has been up to on Linkedin. View a person’s activity whether or not you are connected. The Connect button (if you’re already connected, you’re already all set to use this feature) is where you can follow all the activities and posts of a LinkedIn user.
Case in point: let’s check out what Jill Konrath has been up to by going to her profile and viewing recent activity.
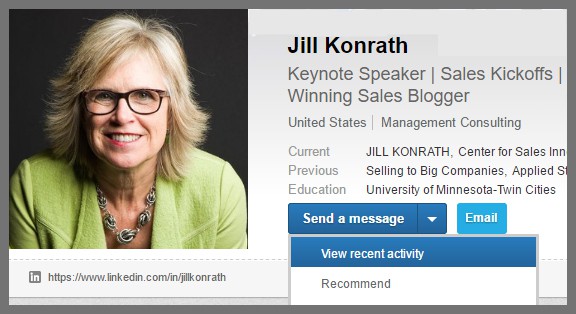
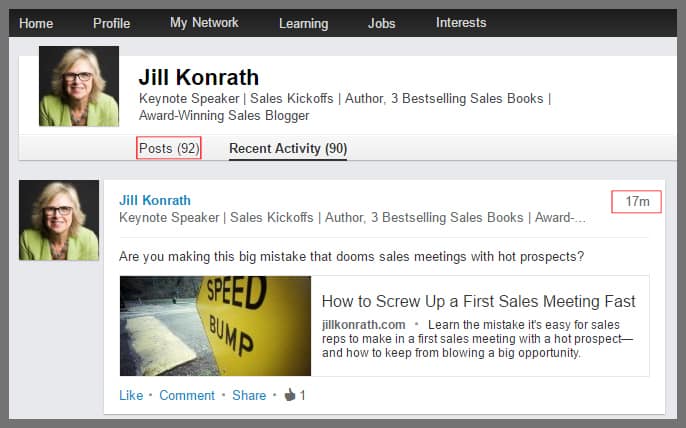
I can see Jill has been pretty busy with 92 posts under her belt – wow! It turns out her last blog post went up 17 minutes ago. As you can tell, the Recent Activity feature gives you a quick glimpse at your contact’s recent LinkedIn output.
Sort and manage connections
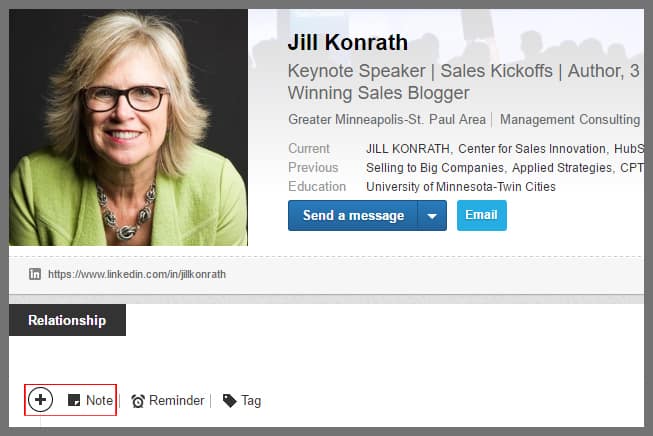
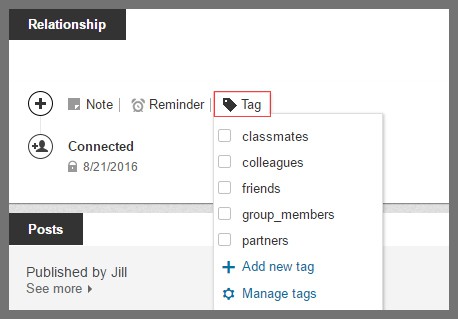
As your network grows, it will be difficult to keep track of who is who or how you are connected to a certain person. To solve this problem, LinkedIn has a neat little relationship tab in each connection’s profile in which you can write notes to help you keep track of your relationship. Only you can see these notes, so feel free to write down important information regarding that particular person.
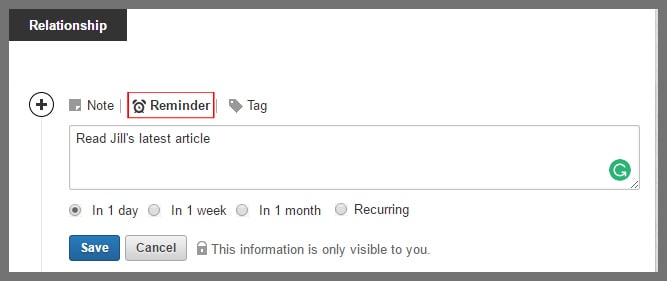
Next to the notes is the Reminder button. Set prompts for important tasks that are even vaguely related to your connection.
Finally, there is a way to set up tags in the relationship section. With Tags, you can sort your connections into different categories. This means you can tag your colleagues, partners, whoever you want under one category using custom tags. As you connect with increasingly greater numbers of people, some of whom you may not see in person or speak to for months or even longer, you may want to utilize this aspect of LinkedIn’s platform to remind yourself of how you know this person or what you intend to achieve, long-term, from this business relationship.
Step # 3- Import email contacts
Instead of adding your email contacts one by one on Linkedin, use the Add Contacts feature. You will find this option under My Network.

After responding to a prompt by entering the email address from which your contacts will be imported, select all those people you want to invite and hit send. These people will now receive requests to connect from you.
Note: Using this approach means that LinkedIn will send out generic invitations on your behalf. If you would rather personalize the invitations, then instead of hitting send, copy and paste the name of the email contact you want to connect with into the search bar. Once you access their profile, you will be able to send customize the invites.
Step # 4- Engage with key prospects
Now that you have found and connected with your prospects, take this to the next level. After all, the main purpose of engagement is to better know your prospects.
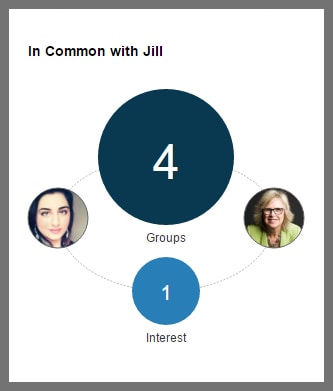
A great way to find common ground is to scroll down your connection’s profile and check the right side. If you both have similar skills or are part of certain groups or passionate about the same causes, all that will be displayed there.
Looks like Jill and I have four groups and one interest in common.
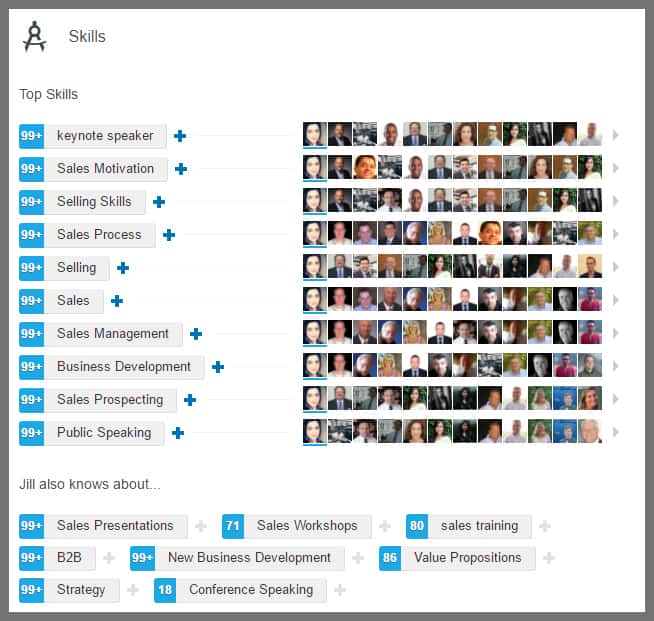
Apart from this, you can also endorse the skills of your connections if you are familiar with their work. Most people list their websites under contact information, so you can head over there to see their skills in action; if you see something that really strikes you about their skills, feel free to endorse and get their attention for it. Usually, people will return the favor and endorse you as well.
You can endorse by scrolling down the to the Skills section (see below).
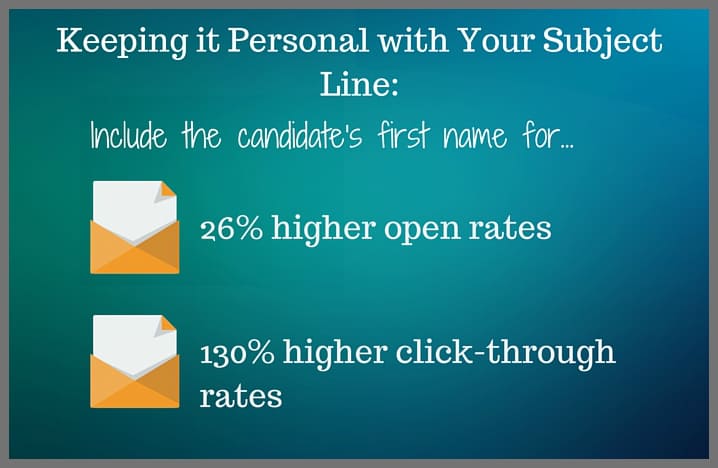
The above tasks are all automatically public interactions, but sometimes you’ll need to get in touch privately with a connection or prospect. One of the best ways is to send them a personalized message, crafted after studying their profile for shared interests, then composing a message pointing out your similarities and making a case for a professional connection.
Check out this really helpful article on writing the perfect LinkedIn message if you aren’t confident enough yet to pull this one off.
Source: Beamery
Another plus point is the ease with which you can build relationships on LinkedIn. If someone in your network has a work anniversary coming up, gets promoted or lands a new job, you’ll get notified in your message section. Sending them a congratulatory message takes no more than a minute but can spark a conversation.
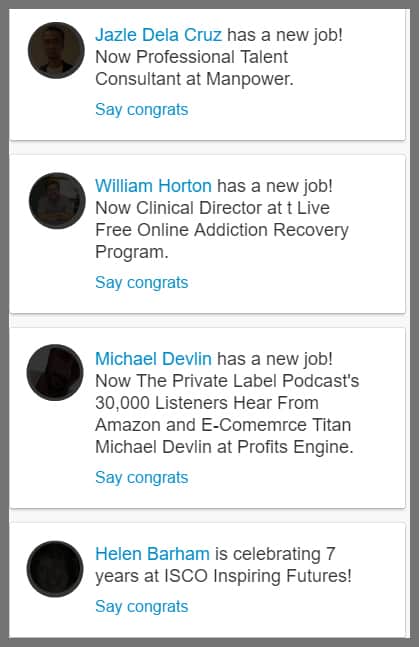
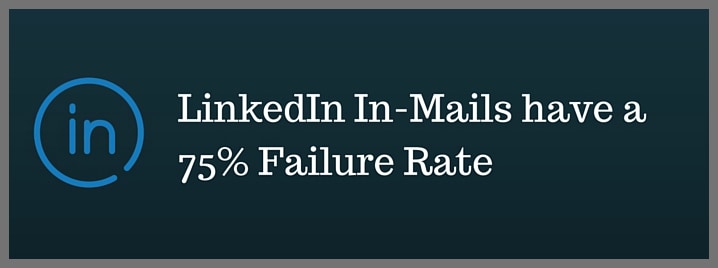
Even though the messaging feature from LinkedIn is adequate, it’s not as powerful as a direct email. Many people have learned to ignore LinkedIn notifications in order to be more productive, while a direct email may be seen right away. For this reason, you need to use direct emails for a better chance at taking your relationship to the next level.
Source:Beamery
Most people, however, do not share their email addresses on LinkedIn and, without having a connection to the other person, you may not be able to reach them via LinkedIn either. You can get around this blockade by using our LeadGibbon plugin to find email addresses for those contacts. (We cover this email address finder, as well as cold email techniques here.)
Step # 5- Join relevant LinkedIn groups
LinkedIn groups are a great source of networking opportunities. You are only allowed to join 50 groups, so make sure to join only the most relevant ones. If a group is inactive or not what you expected, you can leave and join a better one (relax, no one will judge you.) Also, you can only send out 10 group requests at a time. Once your request is accepted, a slot will free up for you to add another group.
LinkedIn’s search bar is a great way to look for groups related to your industry or interest. A casual search for sales groups yields 17,209 results. Go ahead and filter these results further.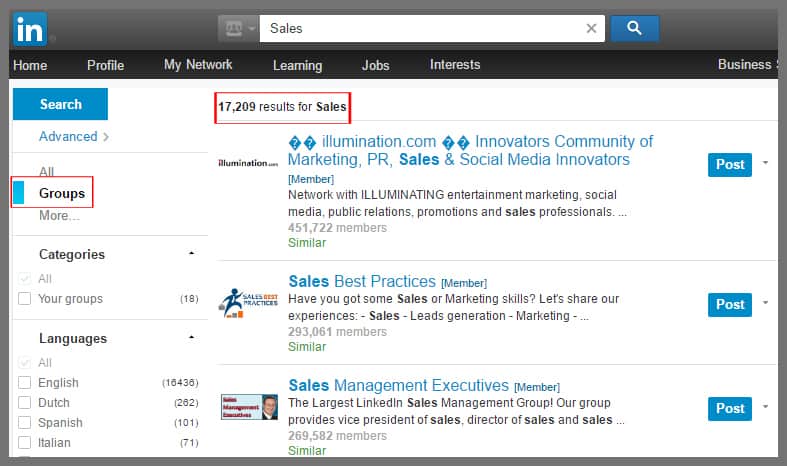 Another way to find groups is to join the ones your connections already belong to. Chances are, many of them are already part of big groups, so maybe join those as well.
Here are some groups that Jill Konrath belongs to. I can browse through the list and join those that look interesting to me.
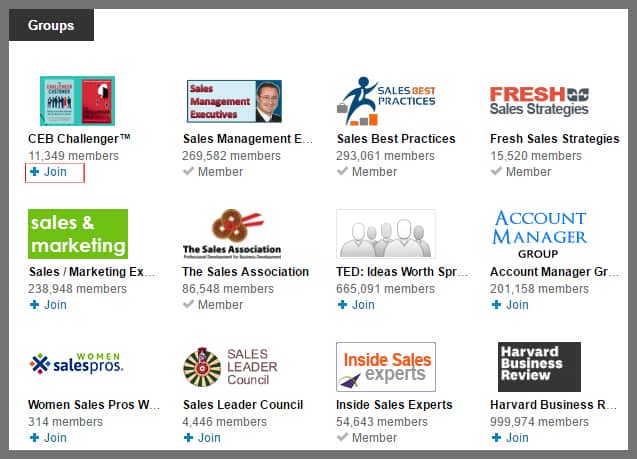
Once a group admin accepts your request, take a minute to head over and read the group’s rules, introduce yourself, share valuable content or go through conversations posted by other members.
You can see what's happening in your groups by clicking on “interests” in the menu bar and then on “groups”. A stream of updates from your groups will show up. This will help you stay on top of what’s new in each.
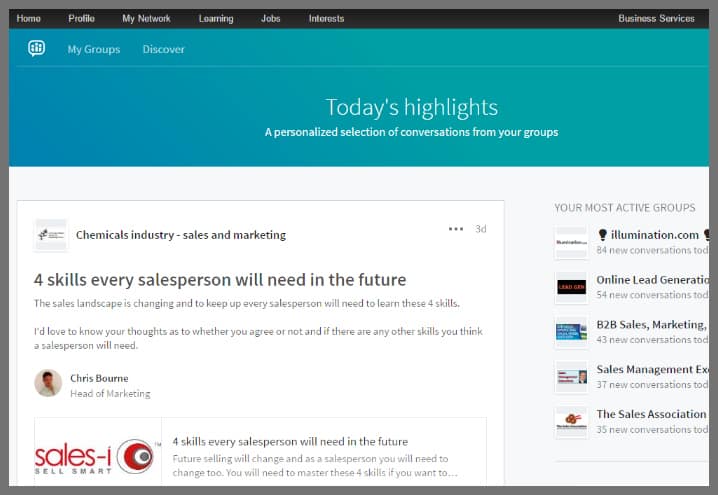
To master LinkedIn groups: take part in discussions, answer questions and provide feedback, all of which can help you expand your network and build relationships.
Bonus: Learn how to use LinkedIn groups professionally.
Step # 6- Share valuable content
No matter your industry, sharing content is a great way to position yourself as an expert, interact with others and provide them with value.
You can share your own content or even curate content from industry experts and authoritative websites. In fact, regularly sharing other people's’ content is much better than repeatedly pushing your own work forward. You can tag the sources of such content as well as any prospect who may find it useful.
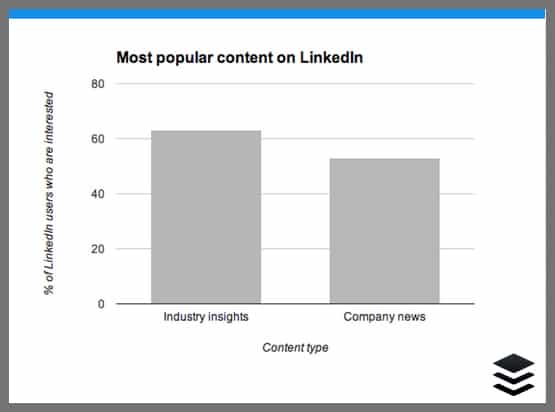
Below is a look at how well common types of content have fared on LinkedIn.
Source: Buffer
Curated content: sure, but from where?
People love to receive, so make it a habit of giving, giving and then giving some more. One way to notice fresh content is to add websites and blogs related to your industry to an RSS feed and regularly peruse it.
For this purpose, I use Feedly to find fresh content on various topics I’m interested in. Going through your feed for a few minutes every day can provide you with tons of new content to share with your network.
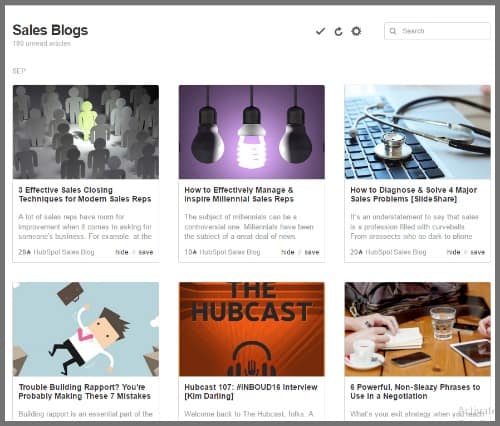
Another easy way to curate content is to check your LinkedIn feed and share content posted by your connections. Don’t forget to hit the like button and to leave comments, suggestions or feedback on such posts. This is a quick way to capture the attention of others with minimal effort.
What time and day works best?
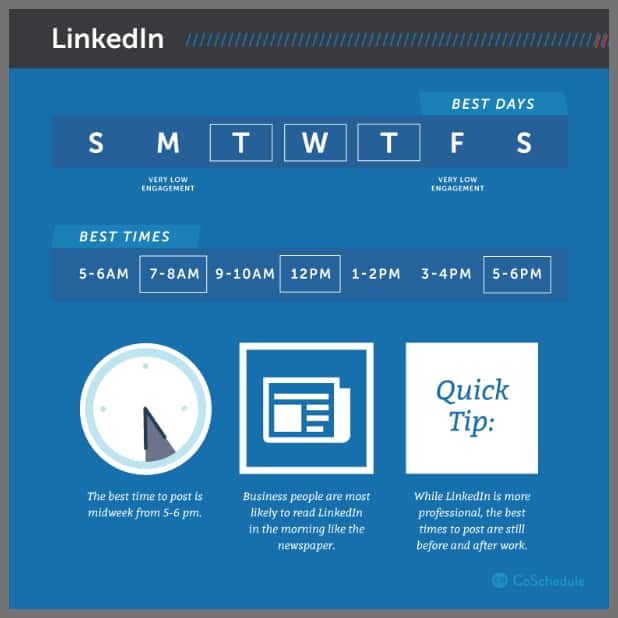
According to Avasam, specific times are optimal for reaching a wider audience on social media; you should tailor your posting schedule to them. Here are the industry-recommended LinkedIn posting times/dates:
Source: CoSchedule
Step # 7- Repurpose content
LinkedIn allows you to publish posts just like you would on your blog. This is a great way to publish bite-sized articles that link to an existing, detailed post on your blog or website. You’ll be providing value to LinkedIn users as well as directing them back to your own site. (You can still use LinkedIn publisher even if you don’t have a blog or website.)
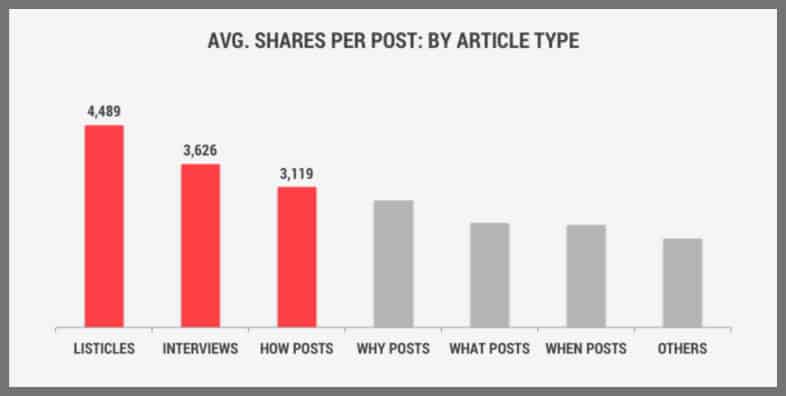
Different articles types have varying degrees of success on LinkedIn, as you can see here:
Source: Top dog social media
Bonus: Here is a great guide that shows how to be successful with the LinkedIn publisher.
Creating slides
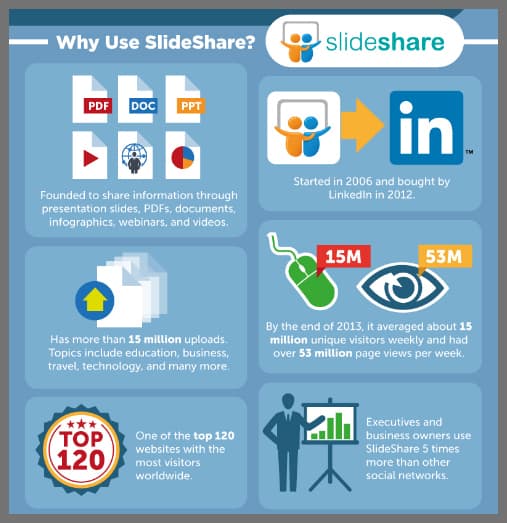
Another way to repurpose content is to take what you already have and create slides that you can upload to SlideShare (LinkedIn's slide hosting service). With SlideShare, your content has the potential to reach even more people.
Source: Who is hosting this?
Bonus: Discover how to leverage SlideShare for more traffic and subscribers.
That wraps up this tutorial. Extra brownie points if you made it this far!
Have a question about something I wrote?
If you have something to add that may improve the helpfulness of this information, I’d love to hear from you.
Whatever the case, leave your thoughts in the comment box below and I will get back to you.

This is a highly informative article. But even Linkedin is starting to stall for people are now exchanging endorsements for the sake of “appearing” more official or more of an “expert”. People will more than likely see the 50+ endorsements rather than go through each one of those one at time to actually confirm if the person is qualified or not. Love to hear your thoughts on this.
You are absolutely right! That’s why I mentioned you should first familiarize yourself with their work before endorsing anyone. It’s much more genuine that way. Also, people shouldn’t just rely on endorsements as proof of someone’s capability. Instead checking their experience, publications or certifications is a much better way.
Good information Shamaila with infographics and charts ..as i will try to convert my advanced profile into star using your tips..thanks
I am so glad you found these tips useful. Thanks for stopping by!